Friday, July 20, 2012
Sunday, March 25, 2012
Not just a bakery
I loved Julie and Julia. And for Christmas my uncle gave me Julia Child's cook books and I was so excited! I couldn't wait to make the famous Boeuf Bourguignon! I think I mentally prepared for this meal for 2 weeks. The recipe is so involved that I'm not going to post it on here, unless someone requests it. So here are some pictures from my adventure.


The cutest baby onions on the planet, right?

OMG!! I'm going to cook the rest of my veggies like this the rest of my life. Using beef bullion, bay leaf and butter. These onions were insane!


We also had potatoes, but I don't eat them so mine had rice.
This meal took me about 5-6 hours, but it was so incredible. And it just continuously got better the more it sat and soaked flavor. We had it for leftovers for the next three days. It was so tasty :)
Every once in a while force yourself to go outside the norm and try something really challenging, you just might surprise yourself.
let me know if you want the recipe and I can post it!
Thursday, March 22, 2012
Happy Birthday Cortney
I have been so lucky to work with someone who has become such a good friend. Miss Cortney Kjar is a babe and I knew that for her birthday I'd have to find a truly awesome birthday cake. The search was on.
Cortney told me she was a really big fan of chocolate and peanut butter.
I had a recipe in my Lion House cookbook for a crunchy peanut butter chocolate cake. Perfect, right?
NO. Thank goodness for test runs.
I made this baby a week ago, and it called to be baked for 50-55 minutes. Like I've said before, I always check cakes like 10 minutes early...I'd never cooked a cake near that long, so I check the cake at 35 min and it was ready to get out! The cake ended up dry and with little flavor. I'm not even going to post the recipe. I wouldn't want any of you to make it.

So I kept scouring the internet. Then finally the day before we were going to have the cake I found this beauty here and as soon as I saw it I knew Cortney would love it and that I had to try it!
One problem, the cake says it takes two days to make, and the party at work was the next day. And I never give a cake out that I haven't already done a test run on. What to do...
Make two anyways!
I made one of these in 4 hours!
And it was a freaking mess. It has to freeze over night and I tried to get away without freezing it. My reasoning behind this was I never give out a cake I haven't tried, so I decided I'd rush it and get a good feel for if it was going to be a tasty cake. I ended up with this baby...

YIKES
But good news, it was delicious!
So I got to working on it again. Freezing it really does make all the difference in the world (clearly).

If you make this you a springform pan for the cheesecake. Otherwise you'll be peeling your cheesecake out of the pan!


It was a hit! And totally worth it the hard work.
From Pinterest to Breakfast
Hello bloggers!
While searching Pinterest for baking ideas, I found this...

-Cake
-Cinnamon
-Breakfast
-Frosting
Yes please!
I knew within seconds of seeing this, that it was up my alley and that I had to make it. You can find the recipe here


Make sure and add ALL of the cinnamon mix, and thoroughly mix it to the bottom of the cake or it will just sit on the top and the flavor won't go throughout the whole cake.


This was so yummy, and absolutely perfect for breakfast or brunch. I do however have one thing I would change about this recipe...The frosting that comes with the recipe is a little bland. I'd use this cream cheese frosting that I use for my cinnamon roll pancakes (I'll do a post, they're incredible).
1/2 stick butter
2 ounces cream cheese, softened
3/4 cups powdered sugar
1/2 tea vanilla
Cream butter and cream cheese together, then add vanilla and finally the powdered sugar.
Other than that small change this was delish! Thank you pinterest :)
Location:From Pinterest to Breakfast
Saturday, February 4, 2012
Chocolate Chip Cookie Ice Cream Sandwich...
I've got this killer chocolate chip recipe from my mother-in-law. But it makes WAY too many cookies so we usually roll the dough up into balls and freeze them to eat later. For the past two weeks or so, Danny and I have pulled out 2 cookies each, baked them and made sandwiches with coffee ice cream.
These are to die for! Warning...if you eat these every day for 2 weeks, plan on gaining some lbs :) but it is so worth it.
Recipe.
1 lb. Butter softened (already off to a good start, right?)
1 1/2 cup sugar
2 cups brown sugar
3 eggs
2 teaspoons vanilla
6 cups flour
1 1/2 teaspoon salt
2 cups chopped walnuts (optional)
1 1/2 teaspoon baking soda
4-6 cups (2 12 oz. packages) chocolate chips
Directions
1. Whip butter, sugar, eggs and vanilla for 3-4 minutes
2. Add mixed dry ingredients to butter mixture, and continue to beat
3. Stir in chips and nuts
4. Cover cookie sheet with parchment paper
5. Bake 8-10 minutes
6. Cool 5 minutes
Notes
I find these cookies are best if when you roll them into balls...don't make them to neat otherwise the cookies will flatten out quickly. Make the balls kind of...lumpy and they will get nice and pretty :)
Grab some of your favorite ice cream, chocolate and carmel sauces and jump in!


Best midnight snack...EVER!
Thursday, February 2, 2012
German Chocolate Cake
For Christmas my mother-in-law gave me an awesome cookbook that I've been wanting for a while...the Lion House desserts and cupcakes cookbook. All of the Lion House cookbooks are to die for. Great recipes for rolls, soups, desserts, casseroles...tons of things. This is my first Lion House cookbook and I was so excited to get baking!
The first one I decided to try was the German Chocolate Cake.
Recipe.
Cake-
1 (18.25 ounce) package white or yellow cake mix (I used yellow)
1 (3.4 ounce) chocolate instant pudding mix
1/4 cup flour
2 cups milk
3 egg whites, beaten stiff
Frosting-
3 egg yolks
1 cup sugar
1 cup evaporated milk
1/2 cup butter or margarine
1 teaspoon vanilla
1 1/3 cups flaked coconut (I used heaping cups, my family really likes coconut)
1 cup chopped pecans
Chocolate Frosting- (double this recipe so you have extra to decorate with)
4 tablespoons cocoa
3 cups powdered sugar
1/4 cup butter or margarine, softened
2-3 tablespoons milk
1 teaspoon vanilla
Instructions-
Preheat to 350
Grease and flour 2 9 in round pans
Combine cake and pudding mixes, flour, and milk and beat according to cake package directions

Fold in egg whites


Pour in pans and bake 35-40 minutes
-depending the oven I always check it 10 minutes before...so at like 25 min, take a peak. Nothing is worse than an over cooked dry cake.
Remove and cool on a wire rack
Coconut Frosting-
Combine egg yolks, sugar, evaporate milk and butter in medium saucepan
Stir over medium heat until thickened...12-15 minutes
Remove from heat, add vanilla, coconut and pecans.
Mix until thick
Chocolate Frosting-
Whisk together cocoa and powdered sugar
Add butter, milk and vanilla. Beat until smooth.

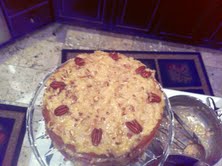
The cake was delicious. It was chocolate, but not too chocolatey. Almost a milk chocolate cake.
I split the cakes in half so there would be more frosting per layer. You can cut these with a serrated knife...or you can use thread and split through the middle of the cake. The coconut/pecan frosting was a little...interesting. So if you notice is calls for evaporated milk...which is not sweet and almost like really thick milk. I continued through the recipe as instructed. As I was finishing I tasted the frosting and realized that it wasn't very sweet. I was even a little nervous that it was some sort of typo and you were supposed to use sweetened condensed milk. I checked three other recipe books and sites and discovered that all of them had a very similar recipe. So I went with it.
When you're making a recipe for the first time just trust it. I made the chocolate frosting...double the batch!!! I barely had enough and couldn't even frost the sides. I did a cake layer, chocolate frosting layer and then coconut frosting.
Let me tell you. This cake is so sweet and delicious. The coconut frosting was incredible!!! Everything else with the cake was so sweet that the coconut frosting was just perfect.
Any questions let me know!! This cake was so tasty and definitely a crowd pleaser! Good luck!
The first one I decided to try was the German Chocolate Cake.
Recipe.
Cake-
1 (18.25 ounce) package white or yellow cake mix (I used yellow)
1 (3.4 ounce) chocolate instant pudding mix
1/4 cup flour
2 cups milk
3 egg whites, beaten stiff
Frosting-
3 egg yolks
1 cup sugar
1 cup evaporated milk
1/2 cup butter or margarine
1 teaspoon vanilla
1 1/3 cups flaked coconut (I used heaping cups, my family really likes coconut)
1 cup chopped pecans
Chocolate Frosting- (double this recipe so you have extra to decorate with)
4 tablespoons cocoa
3 cups powdered sugar
1/4 cup butter or margarine, softened
2-3 tablespoons milk
1 teaspoon vanilla
Instructions-
Preheat to 350
Grease and flour 2 9 in round pans
Combine cake and pudding mixes, flour, and milk and beat according to cake package directions
Fold in egg whites
Pour in pans and bake 35-40 minutes
-depending the oven I always check it 10 minutes before...so at like 25 min, take a peak. Nothing is worse than an over cooked dry cake.
Remove and cool on a wire rack
Coconut Frosting-
Combine egg yolks, sugar, evaporate milk and butter in medium saucepan
Stir over medium heat until thickened...12-15 minutes
Remove from heat, add vanilla, coconut and pecans.
Mix until thick
Chocolate Frosting-
Whisk together cocoa and powdered sugar
Add butter, milk and vanilla. Beat until smooth.
The cake was delicious. It was chocolate, but not too chocolatey. Almost a milk chocolate cake.
I split the cakes in half so there would be more frosting per layer. You can cut these with a serrated knife...or you can use thread and split through the middle of the cake. The coconut/pecan frosting was a little...interesting. So if you notice is calls for evaporated milk...which is not sweet and almost like really thick milk. I continued through the recipe as instructed. As I was finishing I tasted the frosting and realized that it wasn't very sweet. I was even a little nervous that it was some sort of typo and you were supposed to use sweetened condensed milk. I checked three other recipe books and sites and discovered that all of them had a very similar recipe. So I went with it.
When you're making a recipe for the first time just trust it. I made the chocolate frosting...double the batch!!! I barely had enough and couldn't even frost the sides. I did a cake layer, chocolate frosting layer and then coconut frosting.
Let me tell you. This cake is so sweet and delicious. The coconut frosting was incredible!!! Everything else with the cake was so sweet that the coconut frosting was just perfect.
Any questions let me know!! This cake was so tasty and definitely a crowd pleaser! Good luck!
Tuesday, December 13, 2011
14 layer cake
Hello Bloggers-
Since it is finals week and my brain is slightly fried, I haven't been able to bake as much as I would like. So, I've decided to post on some previous projects I've done recently and hopefully I'll be able to get back in my apron after finals have finished.
While getting lost in baking blogs such as Bakerella and Brown Eyed Baker I stumbled across a 14 layer cake. I was immediately fascinated. I looked at the recipe and it seemed doable. I've done this recipe twice and it definitely turned out better the second time so make sure and take my tips because it turned out absolutely fab the second time around!
Recipe...
http://www.oprah.com/food/The-Smith-Familys-12-Layer-Cake
I know it says 12 Layer cake but you'll have plenty of batter for 14 layers.
Make the cake as instructed. I've used 2 different types of pans for this cake. You can go to Cafe Rio and buy their to go tin foil pans for 50 cents each...WARNING some Cafe Rio's say no. In that case go to the grocery store and they should have packs of three for like 2 dollars. Make sure and pam the pans thoroughly and line with parchment paper. The cakes need to come out completely and evenly to get the desired effect. When you pour the cake batter into the pans make sure and use a rubber spatula to spread the batter evenly to the edges. Remember that cake will normally rise taller in the middle of the cake so try to get this as even as possible so your cake will be flat. Let them cool completely before removing.
Make icing as directed. And spread a few tablespoons inbetween each layer and spread to the edges. This is going to drip like crazy.
TIP: If you are decorating your cake on the same surface it will be served on then before placing the cake down put a couple of pieces of parchment paper around the edges so when you decorate and icing/frosting dribbles you can simply remove the parchment paper from underneath the cake and have a clean display.
To make the cake extra rich and tasty add my awesome chocolate frosting recipe all over. (I realize I use this recipe a lot...but it's delicious.)


I really hope someone else attempts this cake because really it's totally doable and sooo delicious!
Let me know if you try it and what you think!
Subscribe to:
Posts (Atom)